Showing posts with label bags. Show all posts

Thursday, March 24, 2016

Gigantic bag to carry my quilt

The last time I hand quilted a large quilt I carried it around in a gigantic plastic bag. I wanted something a bit nicer this time. I decided to use up a few of the blocks from a quilt that I was working on last year. Check out this link to the quilt.

I decided that I did not like it well enough to make a king sized quilt and pay to have it quilted. It looks much better in the photo than it did in person.

So the bag is about 36 inches wide by 24 inches tall. I was not very neat when I was quilting it since I just wanted to get it done. About half way I was sorry that I was not doing a better job, but it looks good enough. That certainly is a surprising statement coming from me the person obsessed with perfection.


  • I sewed the blocks together and then quilted it to warm and natural batting. I had to clean out my bobbin area after that! 
  • Then added the straps that I made really substantial with decor bond. 
  • After sewing the outside of the bag together I lined it with the turquoise fabric. 
I might sew a snap on the center of the bag so it can snap shut. I will make that decision once I see what it is like with the quilt in it. Right now the bag is floppy, but I suspect that it won't be once the quilt is inside.

In case you missed my last blog the quilt that I will be hand quilting is the house quilt. It is 72 inches by 72 inches. Right now I am waiting for more muslin for the backing. I had bought 9 yards of the muslin, but it was not enough for the front and the backing. The houses really used up more than I thought they would.


In case you are wondering what the quilt is behind the door in the first photo above it is a dinosaur quilt I made my daughter back in 1994. It was hand quilted.


Here is the label on the back of the quilt.


Linking to Nina-Marie a day early because we are heading to NJ today.

Thanks for reading.

Chris

Tuesday, March 31, 2015

If I didn’t have bad luck

I’d have no luck at all….

I forget what song that line came from. We have hit a speed bump with our house sale. The septic failed. Our house was built in 1983 and the regulations were different then than they are now. The laterals for the system are in the water table. So the question now is how many thousands of dollars will it cost us to have it fixed? $30,000, $40,000? What a kick in the butt….That will delay the closing as well. You have to hire an engineer, get permits, get the work done and approved. The county heath department gets involved as well. Yikes….what fun….

I pretty much finished the bag except for the snaps. Dritz is sending me 2 new rubber rings for my snap pliers. So as soon as I get those I can finish this project up. It was nice of them to answer my email and offer to send me replacements for free.

I did end up redoing the straps to make them thinner by about 1/2 inch. I also added black fabric strips to the zipper pulls which the pattern did not call for.


I bound the raw edges inside the bag with black fabric as well so now it looks nice and neat inside.


Maybe we should just offer to put an outhouse in the backyard for the people buying our house! Just trying to find some humor in the situation…

Thanks for reading.

Chris

Wednesday, March 25, 2015

Bag nearly done….

Wow this bag has been an experience in making something with really crappy directions. Things were the wrong size. The directions for the handles were really unclear and I don’t think I did them correctly since I think they ended up being about 1/2 inch too wide. But I am not going to go back and change that now. But you never know it might bug me so much that I will go back and make them again. I still have some fabric.


I still have to put binding over the raw edges on the inside so it looks a little nicer. She has no instructions on how to do that….what a surprise. I’m not even sure the width she has you cut them is correct.  

And of course I have to insert the snaps. The snaps are silver so that should look nice.

This could have gone a lot smoother with good instructions. Instructions should be written so that even someone that does not make bags should be able to easily follow the directions.


Thanks for reading. Linking to Off the Wall Friday a day early. With the whiskey tasting tonight and going to visit my dad tomorrow I will not be at my home computer.

Chris

Monday, March 23, 2015

Bag progress

The directions are not that good on this bag pattern so it is slow going. At this point I have the front and back of the bag done. The front pockets were really a pain the the butt. Following her directions they ended up too close to the top of the bag. So I had to take off the flaps, cut them down a bit, and then install them closer to the pockets.

I think the pockets are pretty much decorative because they sure won’t hold a lot of anything. I got out my Dritz Snap fastener/pliers and one of the rubber rings is missing. Now I have to come up with an alternate way of installing the snaps on the pockets.

Today I am onto installing the zipper and making the sides of the bag. Maybe I will get to the handles. I don’t know why she did not put any interfacing in the handles. Seems like you would need it. She has you put it in the pockets and flaps. I will put interfacing in the handles.


I do love the fabric. It is a heavy cotton fabric so will make a good bag in the end.

We have a busy week this week. Most of the stuff is not fun stuff. The crossed out ones are done.

  • Prius service
  • Mold in the attic (they are here finishing this job)
  • House inspection tomorrow (keep your fingers crossed that they don’t find anything wrong with our septic.)
  • Water test on Wednesday since we have well water. Hope our water is OK
  • Whiskey tasting on Thursday (finally a fun thing to do)
  • Pre-construction meeting on the new house on Friday
  • Drive to Pittsburgh to visit my dad and do his taxes.

Thanks for reading. I think I better straighten things up around the house a bit.

Chris

Friday, March 20, 2015

New project

Even though I did not finish the repro quilt I decided to work on a new project. It is going to be an overnight bag. I have been wanting a cool overnight bag instead of the boring Nike duffle bag that I have. Here I have the pieces cut out and marked. The “circle” fabric is on the outside and the diamonds is the lining fabric. The gray is an accent piece for the outside of the bag.


Since this has to be quilted I decided to make a sample piece to see what kind of shrinkage there would be and how much larger to make the pieces to allow for that shrinkage.

I am only going to quilt across the piece in parallel lines to make sure that I get very little distortion in the pieces. Heavy quilting would certainly cause distortion. Of course the next problem is how to mark the lines without having markings to wash out. The answer? Blue painters tape.

I decided to quilt the lines 3/4 inch apart because I thought 1/2 was too close and 1 inch was too big of a spacing. Sometimes when I can’t decide about the spacing I pick the value in the middle.

In this photo I have the ruler on the previous stitching line and then I butt the blue tape against the ruler to mark the next stitching line which gives 3/4 inch spacing.
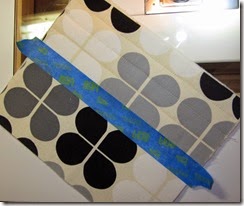


Here is the piece with the ruler removed and the blue tape in place and ready to stitch.


Here is my practice piece all stitched out. It did shrink a little from the original dimensions. Why is it that the lines are perfectly straight in the areas that blend more with the thread and not perfectly straight when the thread contrasts with the fabric?


Do you make bags at all?

I find that the directions for things like bags written by quilters are not the best directions. I come from a sewing background and use to sew lot of clothing, curtains, and Halloween costumes so I am used to the directions from companies like McCall's and Simplicity. They are much clearer directions. I had to read the directions for this bag about 6 times before I understood what I was supposed to do. The directions even had photos and still was vague in several places. They are not the directions that I would have written. I have written lab manuals for several of the classes that I used to teach so I know how to write directions.

Speaking of teaching I heard from a student yesterday that I had written a letter of recommendation for back in January. This is what she said:

Professor,
I am writing to let you know I finally got my letter from CU Boulder and I was accepted. Thanks for writing my recommendation letter and being a great and engaging teacher of astronomy. I signed up for the course because I thought it would be very interesting and cool and you definitely made it so.

So you see why sometimes I miss teaching. Well back to bag making. Linking to Off the Wall Friday.

Thanks for reading.

Chris

Thursday, May 28, 2009

Quilted Duffle Bag Done!

bag1 I finished the duffle bag that I was making for my daughter this morning. I started to make it on Tuesday so it did not take long at all. I am really happy with how it came out.  The pattern was in the book Easy to Make Totes with Zippers by Cindy Taylor Oates.

I originally I bought the cute owl fabric to make my daughter a dress.  Then we were going to make PJ pants with it.  Then it turned into a duffle bag.  I am sure you know how that goes…

bag2

bag3

bag4

Chris

Friday, February 27, 2009

Making a Lunch Bag Out of Old Jeans

My husband needed a new lunch bag so I set out to make one. I found a free pattern at Loving Our Earth at Victoriana Quilters.

lunch bag1My husband thought that I should make it out of some of his old beat up jeans. So that is what I did. I cut up some light denim from a pair of his jeans and some darker denim from an old jacket. I even incorporated the seam from the pair of pants. I thought about adding other decorative elements, but I figured my husband would not really want all of that on his lunch bag.

lunch bag3

I picked out some patriotic fabric from my stash to line it with. I was trying to find a fabric he would not mind as the lining. If it were my lunch bag I probably would have picked something else. I think it took about 2 hours to make it..not long to help the environment.

Chris